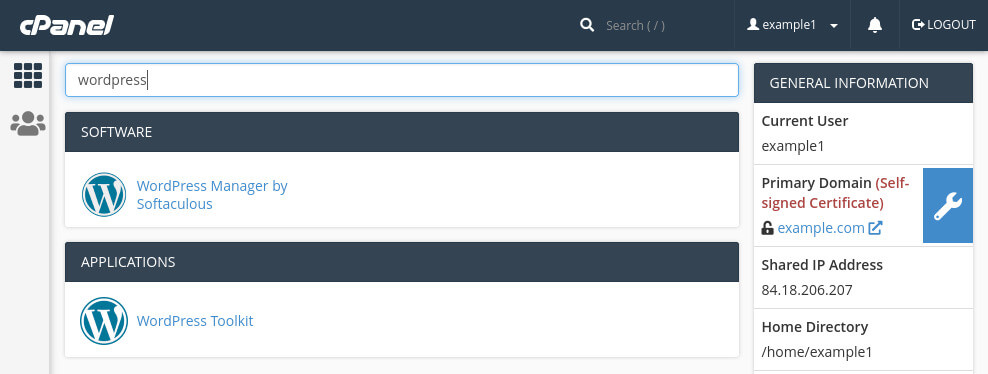
The Softaculous WordPress Manager is one of two tools you use to manage WordPress installs. If you search for “wordpress” in cPanel you also see a WordPress Toolkit option. Both offer roughly the same set of features, but for a long time some WordPress Toolkit features were paid-for. That was rather limiting, and we therefore recommended using Softaculous instead. Since cPanel version 100, released in November 2021, the full Toolkit version is included, so you can now use either Softaculous or Toolkit.
Navigating Softaculous
One downside of Softaculous is that the interface is a little cluttered. Softaculous can manage hundreds of software packages, including Drupal and Magento. That means that there are a lot of options and that navigating Softaculous isn’t always intuitive. Toolkit has a more modern interface, so you might prefer Toolkit for that reason.
To help you get started with Softaculous, you mainly need the navigation items in the top-right corner:
- The cPanel icon (the first icon) takes you back to the cPanel control panel.
- The WordPress icon (the second icon) is the WordPress Manager. The page lists all WordPress installations on your account and you got the option to tweak various settings. I will cover the WordPress manager in this article.
- The icon of an archive folder (the fifth icon from the right) lets you view backups made via Softaculous.
- The logout icon at the very right logs you out of Softaculous and cPanel.
The Softaculous WordPress Manager
As said, the WordPress Manager menu shows all existing WordPress installations on your account. There are two buttons at the top of the page:
- Install lets you install WordPress. Please see our article about installing WordPress via Softaculous if you want to add a new WordPress instance.
- Scan will search for any existing WordPress installs on your cPanel account. So, if you manually installed WordPress then you can use this option to make Softaculous aware of the site.
The Installations section lists all WordPress installs that can be managed via Softaculous. You can expand and collapse each install using the up/down arrows to the right. For instance, the below image shows three WordPress installations on my account. If I want to see the details for any of the domains then I can click on the down arrow to the right of the “Up to date” button. This reveals lots of settings for the selected WordPress install.

Logging in and changing a WordPress password
One nice feature of the WordPress Manager is that can you log straight into the WordPress dashboard by clicking on Login. And, if you have lost your WordPress password then you can quickly change the password by clicking on Change Password.
WordPress settings
As said, expanding a WordPress install reveals lots of settings. I looked at most of the settings in the article about installing WordPress via Softaculous. For instance, I enabled automatic updates for plugins and themes as well as minor updates to WordPress itself. You can also see the website URL and site name below the thumbnail of the website. If you want to change any of the settings, you can do so here.
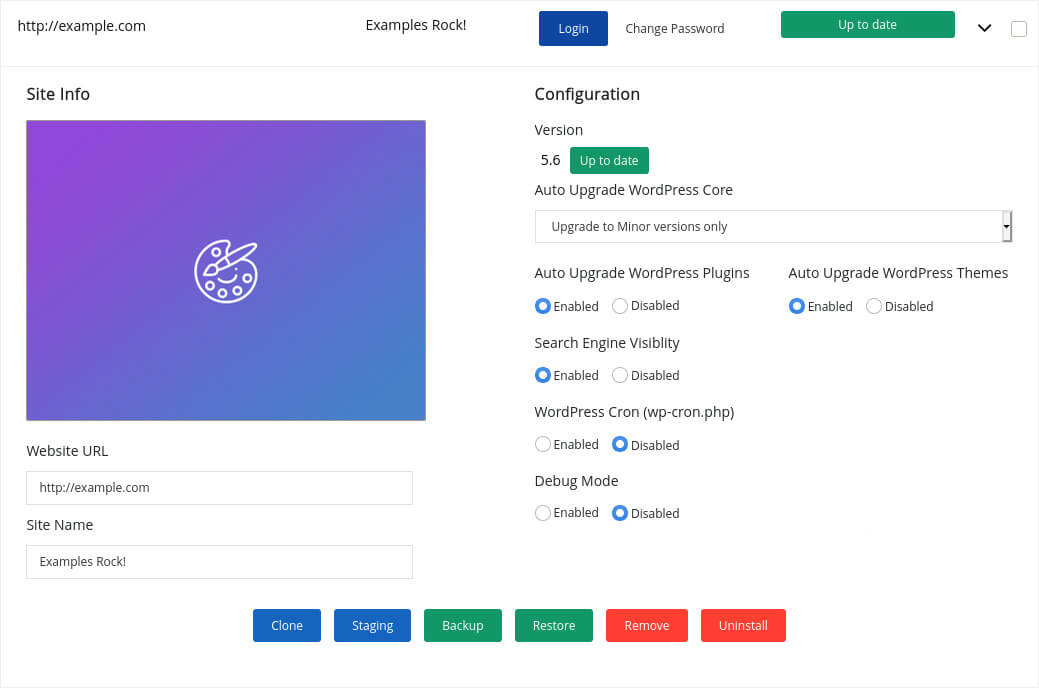
There are a few other interesting options:
- You can stop search engines such as Google indexing your website by setting Search Engine Visibility to Disabled. This is useful if you are working on a new website and don’t want people to stumble upon your website via search engine results.
- Setting WordPress Cron to Disabled replaces the default
WP_CRONwith a “proper” cron job. Doing so is one of our recommendations in our article about important WordPress tweaks. Replacing the default WordPress cron is particularly useful if your website gets a fair amount of visitors. The cron job Softaculous creates will run every 30 minutes. You can edit the cron job via cPanel’s Cron jobs interface. - Enabling Debug Mode sets
WP_DEBUGto true in the website’s wp-config.php file. This can be useful if you are debugging an error. Any PHP warnings and errors will be shown on the website, so you can quickly see which page is triggering what error. Of course, don’t enable this on a production website.
Other options
There are six options at the bottom of the WordPress Management page:
- Both Clone and Staging copy your website. You can clone a website if you want to use your WordPress install as a starting point for a new website. The staging feature is useful as a development version of your website. I look at these features in detail in the article about cloning and staging a WordPress site.
- Backup lets you backup your website files and/or database, and Restore lets you restore your website using one of your backups. I demonstrate how to use those features in the article about backing up and restoring WordPress.
- Remove makes the WordPress Manager forget about your WordPress website, without deleting the website itself. Uninstall deletes the WordPress installation itself.
Related articles
This article is part of a series of articles about Softaculous and WordPress. The other articles are: