Perhaps the killing feature of Toolkit is its ability to easily create a development copy of your website. When you want to make changes to your website you can first create a copy of the website, and if everything is working correctly you can push the changes back to the live website.
How cloning works
Normally, cloning a website is a manual process. At a minimum it involves the following steps:
- Create a subdomain, such as dev.example.com.
- Copy the website files to the subdomain.
- Create a new database for the cloned website.
- Dump the live database and import it to the new database.
- Update the website URL in the database.
- Update the database details in the new wp-config.php file.
Toolkit automates this process. When you select the “Clone” option you just need to provide two bits of information:
- The name of the subdomain. Toolkit creates the subdomain if doesn’t already exist. If the subdomain does already exist it asks you if you want to overwrite the files in the subdomain’s directory.
- The name of the new database. Toolkit suggests a random name, which is usually fine. However, you can change the name if you prefer.
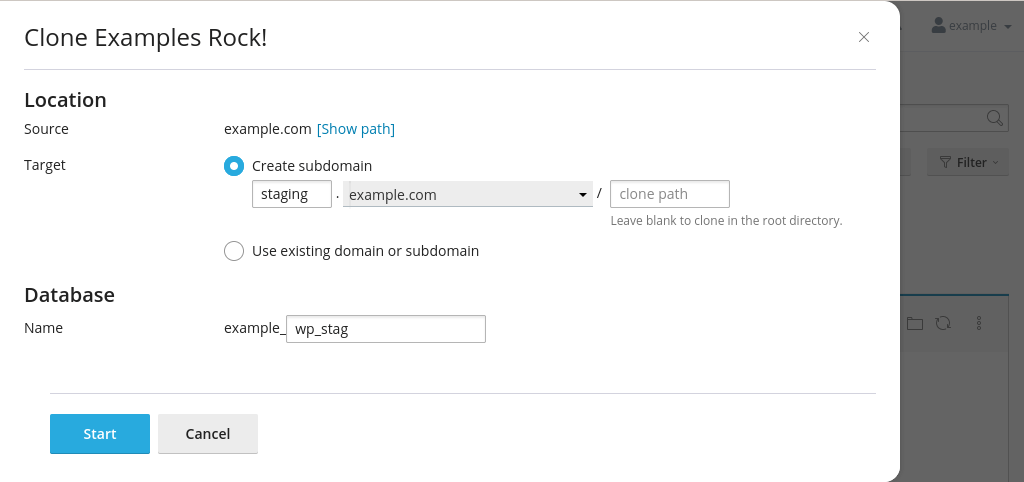
Image: the Toolkit clone options.
Potential issues
There are a few things to be aware of when you clone a website. Most importantly, you need to have enough resources on your cPanel account. If you clone a site that uses 1GB of disk space then you need to have at least 1GB of free space available.
Similarly, you need to be able to add a subdomain. Most cPanel accounts have a limit on the number of subdomains you can add. If there are none available then Toolkit can’t create a new subdomain.
And there are also some edge cases. For example, Toolkit won’t be able to clone the database if the database user doesn’t have the LOCK TABLES privilege. Please contact us if you run into an unexpected error: we can usually quickly fix such issues.
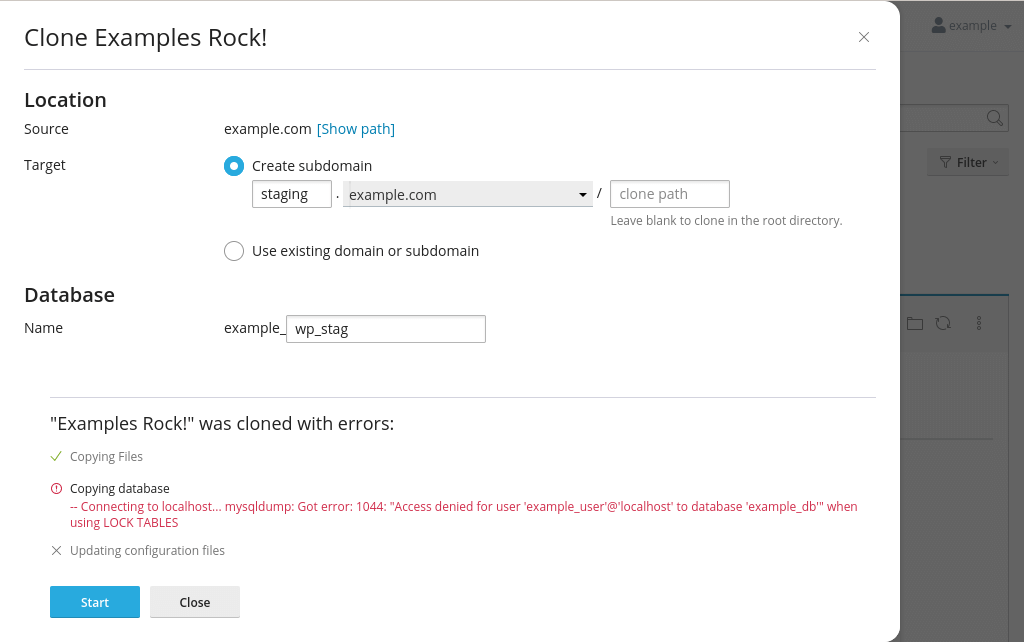
Image: the database user needs the LOCK TABLES privilege.
And finally, Toolkit doesn’t clone the environment. For instance, it won’t check if the PHP version for the cloned website is the same as the PHP version for the main website. Similarly, Toolkit also doesn’t check if the cloned website has an SSL certificate. If the main site’s WordPress URL is https://example.com then the staging site will also use HTTPS, even if there is no SSL certificate for the domain.
Some other settings are retained. For instance, if take over wp-cron.php is enabled for the main site then it is also enabled for the cloned site. So, it is a good idea to check the basic settings after you have cloned a website, and you may need to do some tweaking.
Syncing changes
Cloning is only half of the story. After you have made changes to a development or staging site you typically want to push those changes to the live site. In Toolkit on cPanel you can use the Copy Data feature for that (Toolkit on Plesk works slightly differently).
The feature has quite a few options for copying data. The most important thing to get right is the target. This is the website to which data will be copied, so you want to be 100% sure you select the right domain.
You also need to take care when deciding what to copy from the staging to the live site. While you were working on the staging site the live site might have changed. For instance, users may have added new content; visitors might have left comments on your blog and customers may have bought products from your store. If you simply copy the staging site to the live site all those changes are lost.
Dealing with merge conflicts
In other words, you may need to deal with merge conflicts. This can be a little tricky, but Toolkit gives you a few sensible options.
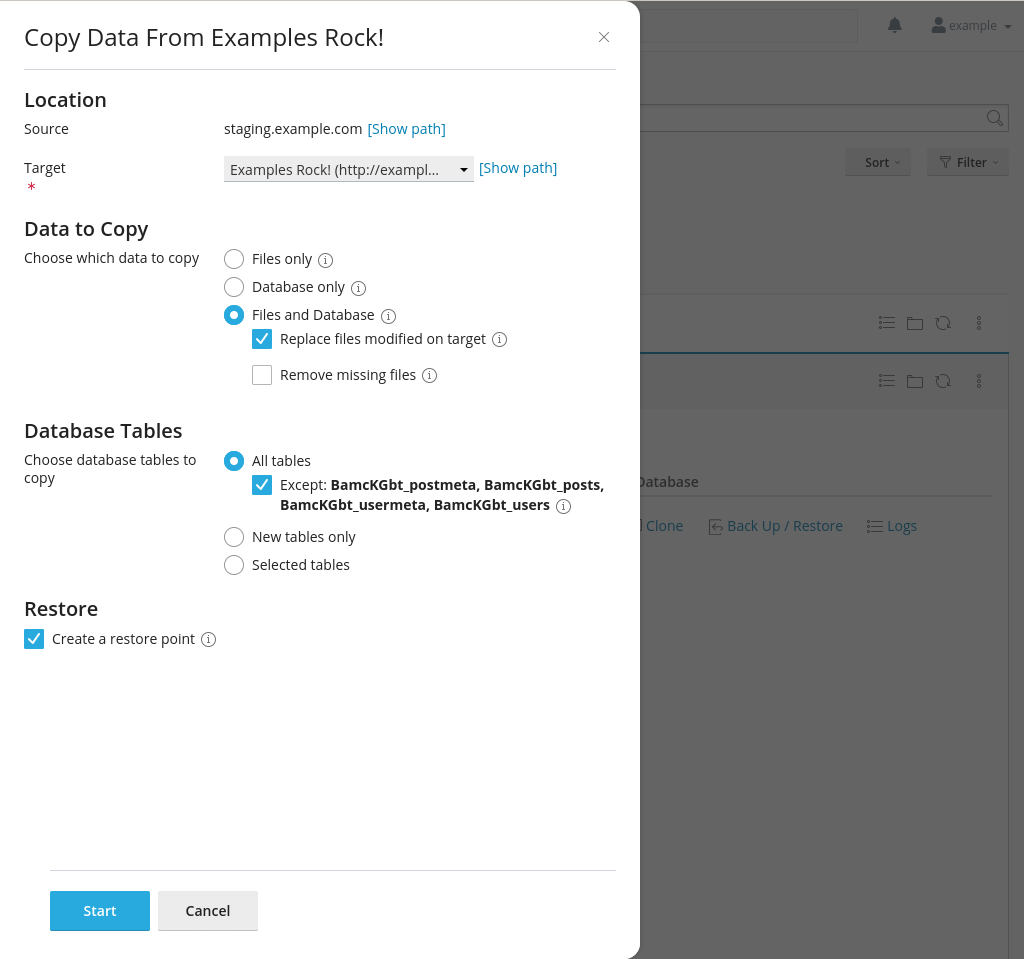
Image: the options for copying data from a staging site to a live site.
File options
Firstly, you can decide what data you want to copy. By default, Toolkit copies both the website files and database, and it will copy all files – even if a file has been modified on the live site since the staging site was created. For instance, let’s say the wp-config.php file on the live site has been updated since the website was cloned. If replace files modified on target is selected then the file is overwritten, even if the file on the target is more recent than the file on the source.
The remove missing files files option deletes files from the live site that don’t exist on the staging site. This option can be useful. For instance, if you deleted a plugin or theme on the staging site then it doesn’t make much sense to keep those files hanging around on the live site.
Database options
The Database Tables section is important as well. By default, Toolkit copies all database tables, except for the posts and users tables. If you modified content or edited users on the staging site then you don’t want to exclude those tables. However, you do need to be aware that the tables may have changed on the live site.
If you are familiar with the WordPress database then you can also select which tables you want to copy over. This can be handy if, for instance, your website has a shop. You don’t want to lose any order information, and you can therefore exclude any tables that store customer and order data.
And finally, the “new tables only” option is mainly useful if you installed a plugin that has its own table(s) in the database. The new tables are copied to the live site, but all other tables are left untouched.
Restore point
Admittedly, the options can be daunting. That is just how it is – cloning and syncing websites always causes potential merge conflicts. By default, Toolkit does create a restore point when you copy data. So, if it all goes wrong then you can always restore the live site from the backup.
Restore points are different from Toolkit backups. When you select the restore point option Toolkit makes a backup of the website files and database (stored in ~/.wp-toolkit/snapshots). The restore point is then displayed under the Dashboard tab of the instance card.
Toolkit logs
As an aside, a nice feature of Toolkit is that it keeps a log. For instance, when you copy data you get step-by-step log entries. The entries aren’t very detailed – it doesn’t for instance show what options were selected – but it does you give you basic details, including timestamps.
Removing a cloned website
You can delete a cloned website via the main Toolkit page. Simply select the cloned website; triple-check that you have only the cloned website selected; and hit the Remove button.
Removing a WordPress instance purges the website files and database (including the database user). However, it does not remove the subdomain itself.