This article explains how to set up an email account in Outlook 2016. We will also go over how to archive emails in Outlook.
Configuring a new email account
You configure a new mailbox in Outlook via File > Add Account. From the File menu you can also select Account Settings > Account Settings, as shown in the below screenshot. And yes, it is a little weird that there is an option called Account Settings in the Account Settings menu!
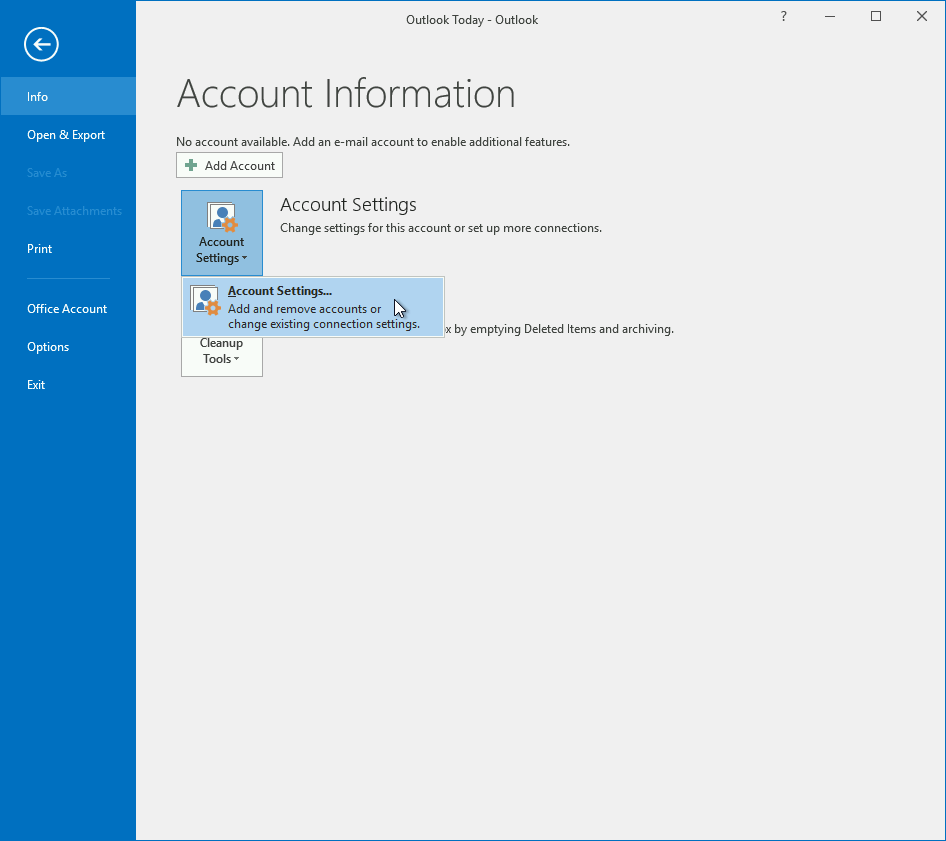
Image: getting to the account settings in Outlook 2016.
The Account Settings window has a number of tabs. The first tab, Email, is the most important one. Here you can see existing accounts and create a new mailbox by clicking on the New button. As an aside, you can view and edit the settings of email account listed under this tab by double-clicking on the email address.

Image: adding a new email account.
Add account
You should now see the Add Account window. Here, you have the option to either let Outlook try to figure out the settings needed for the mailbox or choose to manually enter the settings. What option to choose depends on the type of email account you are setting up:
- If you are configuring an Exchange mailbox then you can simply select Email Account. After entering your name, email address and the password for the email account Outlook should be able to find the settings. Note, however, that this will only work if your domain has the correct autodiscover CNAME record.
- Choose Manual setup of additional server types if you are configuring an IMAP or POP3 account. For the rest of this article we assume that you are setting up an IMAP account, which is the most common type of email account.

Image: we will manually configure our IMAP mailbox.
Assuming that you selected the manual set-up option you next need to confirm that you want to connect to an IMAP or POP account.
Enter the server settings
You need to be a little careful in the POP and IMAP account settings window. By default, Outlook 2016 will retrieve emails using POP rather than IMAP. We recommend changing this to IMAP, in particular if you are setting up your email account on more than one device.
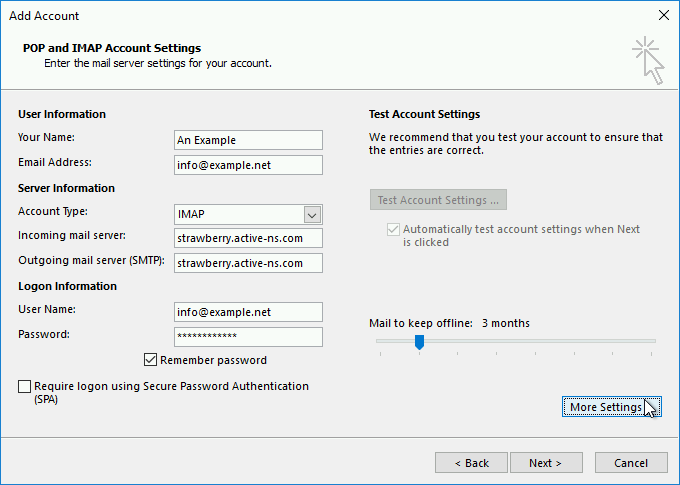
Image: the basic settings for our IMAP account.
Apart from that the settings you need to enter are all straight forward. You need to enter your name (as it will appear to people who receive emails from you), your email address and the server information. Our example.net email account is hosted on the Strawberry server, which has the hostname strawberry.active-ns.com. You can find the server name for your domain in your welcome email or via your hosting control panel.
The user name showing under Logon information should be your email address, and the password is obviously the password for your email account. Please make sure that the Remember password checkbox is ticked.
Require logon using Secure Password Authentication should not be ticked. This option is linked to a proprietary Microsoft protocol for connecting to mail servers which is supported on very few servers. Instead, we will use a standard way to connect securely to the mail server.
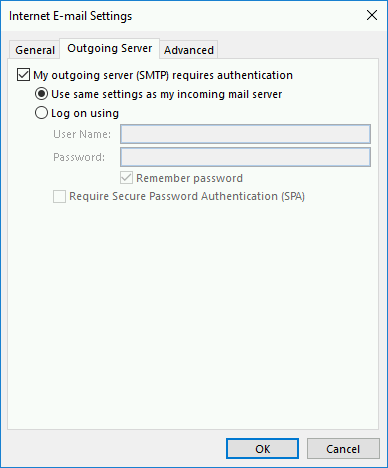
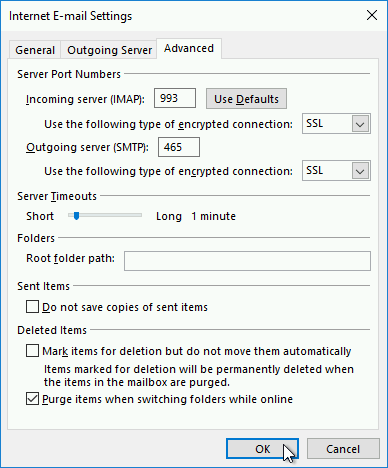
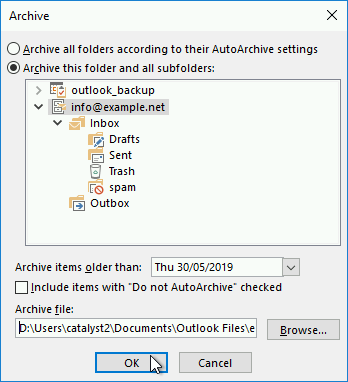
To do so we need to change some more settings, which are hidden behind the More settings button. Clicking the More settings button will open another window. By now you should have three Outlook windows open (after all, the operating system is called Windows…). Image: SMTP authentication is always required. On the Outgoing server tab you need to make sure that My outgoing server (SMTP) requires authentication is ticked. It is fine to keep Use same settings as my incoming mail server as the way to connect to the server when sending an email. This option will use the user name and password you enter earlier to connect to the server when sending emails. On the Advanced tab you need to make sure that the port number for the incoming (IMAP) server is 993. If you are using POP instead of IMAP the port number should be 995. For both IMAP and POP the type of encryption should be SSL. The Outgoing (SMTP) server should use port 465, and the type of encryption should again be SSL. Note that Outlook has a habit of changing the port numbers when you select SSL from the type of encryption drop-down list. Please double-check the settings on this tab before you hit the OK button. Image: the port numbers and encryption settings. After clicking the OK button Outlook will try to send and receive a test message. If you get any errors, please double-check the settings and contact us if you get stuck. The error messages can be a little cryptic, and we are here to help. Outlook has a Mailbox cleanup section that contains a few options for dealing with old emails. You can access the options via File > Mailbox Cleanup. You can archive emails via the Archive option. Here, you can select either an entire mailbox or an individual folder in which you want to archive emails. You can then select a date from which emails should be archived. In the below example we have selected the entire info@example.net mailbox and we are archiving emails older than 30/05/2019. Image: the Archive window. Finally, you need to select an archive file. Outlook uses .pst files for email archives, and it will create the file if it doesn’t exist. After clicking OK you should see an Archives menu in the left-hand pane of Outlook, either just above or below your email account. As you can see in the below screenshot, the one email in the inbox for info@example.net was successfully moved to the inbox under Archives. Image: the Archives mailbox, now containing the archived test email. If you find that you are archiving emails older than, say, two months every couple of weeks then you can automate the process: Tick the Run AutoArchive every… checkbox to enable auto-archiving and select how often you want Outlook to archive emails. In the below screenshot we are running the archiving job fortnightly, and we have told Outlook to archive emails older than two months. Image: the auto-archiving settings. It is worth mentioning that different folders can have different archive settings. If you right-click on a folder, such as the Sent folder, and select Properties you will see an AutoArchive tab. You can either exclude the selected folder from auto-archiving or create a different rule for the folder. For instance, for the Sent folder you could decide to only archive emails older than four months. So far we have only looked at archiving emails based on the age of the email. Another option is to manually move emails to folders under Archives. To do so, simply select the emails you want to move and drag them to the relevant folder under Archives. This can be a quick and easy way to archive from a specific person, or emails that are particularly large.
Port numbers and security
Archiving emails


Manually archiving