cPanel’s Email Accounts page lets you create new email accounts for your domain. You can also use the page to manage existing email accounts and to access web mail.
Every cPanel account has one default mailbox, which is automatically created when your cPanel account is set up. Although you can send and receive emails via the default mailbox we strongly recommend that you create a custom mailbox instead. That is because the default account is mainly a catch-all mailbox. Its job is to deal with emails sent to non-existing email addresses.
Creating a new mailbox
You can create a new email account by clicking the Create button, as shown in the below screenshot.

Image: creating a new email account.
There are quite a few options when you create an email account. I will break down the Create an email account form in two parts: the basic settings and customisations.
The basics
If you got more than one domain then you can pick the domain for which you want to create an email account from a drop-down list. Any addon domain and subdomain on your cPanel account is listed in the drop-down menu. If you got just a single domain then the Domain option isn’t shown.
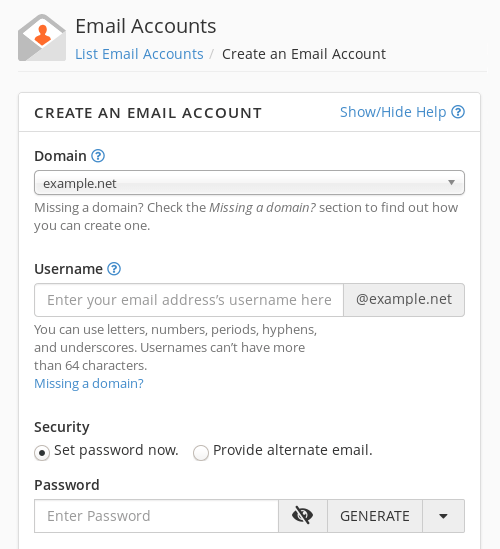
Image: the basic email settings.
Next, you need to enter the username. This is the part before the @-sign and can be anything you like. The only restrictions are that the username can’t have more than 64 characters and that you can only use letters, numbers, full stops, hyphens and underscores. You can enter upper-case letters but they are automatically converted to lowercase, as by convention email addresses don’t contain capitals.
Email password
The last basic setting is the email password. You got two options for setting the password:
- Set password now lets you enter (or generate) a password.
- Provide alternate email will instead send an email to the email address you enter. The email will include a link which the recipient can click to set a password.
The second option is useful if you are setting up an email address for someone else. Rather than giving the user a password you can let the user create their own password. The user is sent an email with a link to a login page, and after setting the password the user can log in to the web mail client (which is Roundcube by default).

Image: the login page via which users can create their own password.
It is worth mentioning that cPanel checks the strength of passwords. For instance, cPanel will reject any commonly used passwords, such as qwerty or passw0rd. We strongly recommend to always use unique, long and randomly generated passwords (use a password manager to store your passwords).
Configuration options
You got three configuration options when you create a new email account:
- Setting the available storage space
- Folder creation for plus addressing
- Sending a welcome email
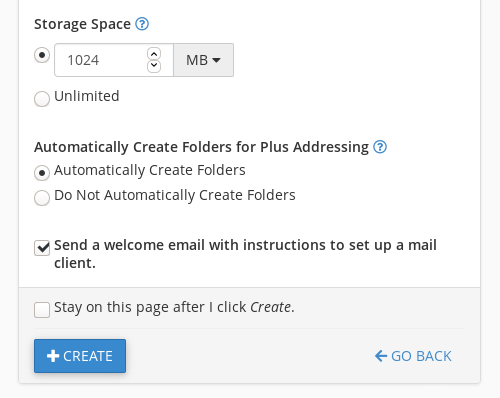
Image: the configuration options.
Storage space
By default each mailbox gets a quota of 1,024MiB (1GiB). The storage space is the total amount of disk space the email address can use. This is an important setting, as an email account stops working when it reaches its quota.
It may be tempting to set the storage to a very large value, or even to “unlimited”. Be aware, though, that increasing the mailbox quota doesn’t necessarily give it more space. That is because your hosting package itself also has a disk space quota. If, say, your hosting package has a quota of 2GB then your email account should always use less space than that.
To illustrate this point, lets imagine you got a hosting package with 2GB of disk space. You are using your hosting package to host both a website and two email accounts. If the website needs 1GB of disk space then you have 1GB of space available for your email. As you got two email accounts, that is 500MB for each email account.
As said, an email account stops working when it reaches its disk space quota. You will no longer be able to send emails, and incoming emails will get stuck in the mail queue. The mail server will try to deliver these emails at specific intervals for four days. If the email hasn’t been delivered within that time it will bounce (i.e. the delivery attempts are cancelled and the sender gets a bounce email). This means that you do have some time to deal with an email account that has reached its quota. And of course, we are happy to help with such issues.
Plus addressing settings
Plus addressing is a feature that can be used to organise your emails and/or to prevent companies from storing your real email address. How this works is best illustrated with an example.
Let’s imagine that your email address is info@example.net. Like all email addresses, it is made up of two parts: the username (info) and the domain (example.net). Plus addressing lets you use variations on the username. To do so, you add a plus sign followed by a word after the username.
For instance, if you need to use your email address to register with Evil Corp and you are worried that the company will use your email address for “marketing purposes” then you can use an email address such as info+evilcorp@example.net. You can also use a more generic address such as info+nospam@example.net.
Plus addressing is supported out-of-the-box. The Automatically create folders for plus addressing option lets you choose whether or not you want cPanel to create folders for plus addresses you use. By default, folders are created automatically. So, cPanel automatically creates a folder named nospam when you start using the address info+nospam@example.net. Any emails sent to that address are then delivered to the nospam folder.
If you choose to not automatically create folders then emails sent to plus addresses are delivered to your inbox instead. In other words, the option lets you decide how to organise emails sent to plus addresses.
Welcome email
You can also choose whether or not you want cPanel to send a welcome email to your new email address. The default option is to do so, and we recommend keeping that settings. The welcome email includes the settings you need to set up the email account in email clients, such as the incoming and outgoing server names. However, if you don’t have the welcome email, you can find the settings at any time via the Manage menu (the option is called Connect devices).