Change to Green E-mail Setup
Email Changes on Green – All you need to know
As part of our constant drive to offer a high quality secure service we will be making some changes to the way email is sent on our Plesk Windows server ‘Green’.
Below will advise on the changes you need to know and how it can affect you. We have also included information on how to edit your email settings to adhere to the new configuration.
What changes will we be making?
We consistently review our security procedures and policies to make our infrastructure more robust and resilient. As part of this we will be updating some authentication settings when sending email on our Windows Server Green.
This means that if you send email using Green, you may need to update your settings before you can send emails.
Why are we making this change?
The reason this change is being made is to ensure the server is as secure as possible. The change is to ensure the server can authenticate emails being sent properly and to ensure only legitimate email is sent. This means that spoofing becomes much harder and less spam email is sent as a result. Any domains being used to inadvertently send spam will not be sent.
How does it affect me and what do I need to do?
Website Scripts
If you send emails via your website you may find that they will need to be updated to include authentication details when sending. If this is not done you could see an error when trying to send the email.
If you need help with this please do get in touch and we’d be happy to help.
Email Clients
The changes we will be making will affect customers who currently do not have the correct settings enabled for outbound email (SMTP). After the change emails will not send unless you have the settings below selected and authenticate your account before sending.
We have put together a short guide below on most common email clients and where you can find this information below.
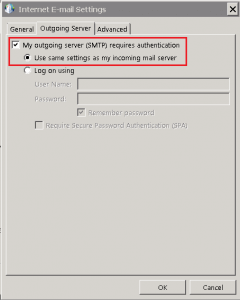
Microsoft Outlook
- Close Outlook if already open
- If using Windows Press the control key + R
- Type in ‘control panel’ and press OK or hit ‘Enter’
- Click the ‘Mail’ Icon in the list. If you don’t see this list click the drop down button on the top right and select ‘Large Icons’
- Click on ‘Email Accounts’ and double click on your email account to open the properties
- Click on ‘More Settings’ on the bottom right and then click on the ‘Outgoing Server’ tab.
- Now make sure that ‘My outgoing server (SMTP) requires authentication’ is ticked and that the ‘Use same settings as my incoming server’ is selected.
- Click OK and every window and start outlook.
Mac Mail
- In Mail Mac, choose Mail > Preferences
- Click Email Accounts and then ‘Server Settings’
- Click the outgoing Account pop-up menu, then choose ‘Edit SMTP Server List’
- Double click the server for your mail account.
- Ensure the port is set to 465 and that SSL is turned ON.
- Click ok or ‘Save’ and go back to the previous screen and ensure you have entered the username (your full email address) and password in.
iPhone/iPad
- Go to your iPhone settings
- In the ‘Accounts’ section find ‘Email Accounts’ and then tap ‘Server Settings’
- Find SMTP Servers and tap on the list to edit the account.
Android

- Open your email app and open the settings
- Find your email account and tap on it to open
- Under ‘Advanced Settings’ tap on ‘Server Settings’
- Under Outgoing Server enter the server information and input your username (full email address) and password. Port number should be 465 and SSL should be ON.
I need help or have questions about the new update?
If you have any questions about this change you can get in touch with our specialised teams who are on hand to help. Just call us on 0800 107 7979 or send us an email to support@catalyst2.com.
Alternatively you can get in touch via Live Chat.
Featured Blogs
Managed vs Unmanaged Dedicated Servers; Which is Right for Your Business?
Many businesses rely on hosting providers for dedicated servers to ensure optimal performance, security, and control. Unlike shared hosting, where resources are divided among multiple users, a dedicated server offers exclusive access to all of the server’s resources. This makes it ideal for businesses that experience high traffic, require substantial resources, or operate in data-sensitive …
Dedicated Server Basics; Everything You Need to Know
With businesses receiving more traffic on their websites than ever before, as more people engage online, the need for a dedicated server has become vital. While smaller businesses can often use shared hosting and virtual private servers, larger businesses with high traffic typically require more advanced and comprehensive hosting solutions; dedicated servers emerge as the …
Tips for Creating a User-Friendly Website
When designing a website, prioritising user-friendliness is crucial for success, especially for businesses offering products or services. A user-friendly website is not just nice-to-have; it’s a necessity. It ensures that visitors can easily navigate your site, enjoy a visually appealing interface, experience fast loading times, and seamlessly interact with the content. However, creating a user-friendly …
Discussing the Importance of Server Scalability for Business Growth
For business growth, meeting the increasing demands of customers can be challenging. It’s essential to keep pace with these demands without compromising on performance. As a business expands, it typically encounters higher traffic volumes, larger data storage needs, and the requirement to support more complex applications which is where server scalability becomes crucial. Server scalability …
Effective Ways to Improve the Credibility of Your Website
Now, more than ever, the credibility of a business’s website is crucial for building trust with the target audience and achieving business goals. A credible website not only attracts visitors but also keeps them engaged, encourages conversions, and encourages long-term relationships. A strong online presence is essential for businesses to thrive and compete effectively. Investing …
Best Practices and Strategies for Server Backups.
Ultimately, data is essential for businesses. Whether it’s customer information, transaction records, or proprietary business data, safeguarding this information is crucial for any organisation. One of the most effective ways to protect your data is through regular and robust server backups. By implementing a comprehensive backup strategy, businesses can mitigate the risks associated with data …
The Benefits of a Proactive Approach to Securing Your Website
In the digital age, website security is more than just a technical requirement; it’s a fundamental aspect of business strategy. With the rising incidence of cyber threats, protecting online assets has become crucial for businesses of all sizes. By implementing proactive security measures, such as secure dedicated server hosting, automated security patching, and continuous monitoring, …
Identifying Common Server Issues and How to Avoid Them
To maintain a smooth operation of any online business or digital service you need a server that is efficient and that you can rely on. Here at catalyst2 we understand the challenges that businesses face daily; purely to keep their business alive so the challenges that are faced in addition to this when server issues …
Why Server Backups are a Safety Net in the Digital World
Data is the foundation for businesses as it provides insights into customer behaviour and trends, as well as business performance and efficiency. So, businesses have the tools they need to make informed decisions and plan strategically. For businesses that are just starting out or that are smaller, data is a catalyst to help identify growth …
What are Flexible Servers and When are They Beneficial?
The word ‘server’ is frequently used in everyday discussions in IT departments within organisations, but unless you work in the tech industry, you might not be familiar with what it really means. A server is the backbone of all digital operations. It is there to manage tasks like data storage, processing requests, delivering content across …
What our clients say
Everything is fine, thank you. The queries I had were dealt with in a prompt, professional and truly friendly manner! I have never experienced such superb service from any other supplier!
You guys and Catalyst2 are awesome!