ConfigServer Firewall (CSF) is commonly used on cPanel servers to stop malicious traffic going in and out from a server. Like most other firewalls, CSF is a frontend for iptables. One of the main advantages of CSF is that it has a graphical interface. It is not part of WHM/cPanel – the software is made by a UK company – but it can be installed as a third-party plugin.
CSF is closed source software but is free to download and use. However, the cPanel plugin and some complementary tools are not free. We use CSF on all our shared servers and it can be purchased for VPS and dedicated servers.
Configuration
CSF uses a Login Failure Daemon (LFD) that checks logs for failed SSH, POP3, IMAP, FTP and HTTP password protection logins. The latter only applies to password protected directories and not to for instance failed WordPress logins. The actual blocking (or unblocking) of naughty IP addresses is done by CSF.
As we are a managed hosting company we always configure the firewall for you. The configuration for both CSF and LFD is managed via /etc/csf/csf.conf. Among others, the file lists what ports should be open and when IP addresses should be blocked. We typically configure CSF/LFD so that an IP address is blocked permanently if there are five failed logins within an hour.
Quick Allow, Quick Deny and Quick Deny
The graphical interface for managing CSF is at WHM » Plugins » ConfigServer Security & Firewall. There are more options than I can possibly cover in this article, so I will focus on blocking and unblocking IP addresses. This is fairly straight forward but there are a few things to be aware of.
Allowing and ignoring IPs

Image: You can allow or block an IP address with the click of a button.
The Quick Allow button adds an IP address to the /etc/csf/csf.allow file. IPs listed in the file are never blocked. LFD still reports failed logins for the IPs and it still asks CSF to block an IP address if there are too many failed logins. However, CSF won’t block the IP address.
Ignoring an IP works slightly differently. LFD still notices failed logins for IPs listed in /etc/csf/csf.ignore but it doesn’t ask CSF to block the IPs. You should only add IP addresses to csf.ignore that are static and trusted. For instance, you can add the IP address of a network monitoring tool. However, the file should not be used for the IP address of website owner who was blocked because of, say, failed FTP logins.
Blocking IPs
The Quick Deny option adds an IP address to /etc/csf/csf.deny. You can optionally add a comment. Adding a comment can be useful, as you (or one of your colleagues) can later see why a particular IP address was blocked. You can also use the comment field to prevent that the IP address is removed from the csf.deny file. If you add a comment that ends with the string “do not delete” then the IP address can’t be removed via the Quick Allow button. The entry also won’t be removed when the maximum number of IPs in the csf.deny file has been reached. When the file has grown too large the oldest entry is removed – but only if it doesn’t have a comment that ends with “do not delete”.
As an aside, you can use CIDR addressing when you block, allow or ignore IPs. For instance, you can allow the IPs 11.22.33.0 to 11.22.33.255 by adding 11.22.33.44/24 as the IP address.
Temporary blocks
By default, IP addresses are allowed or blocked permanently. You can instead configure CSF to temporarily allow or block an IP address. Exactly how to configure /etc/csf/csf.conf is beyond the scope of this article, but contact us if you want to discuss how CSF is configured on your server.
It is more common to manually block or allow an IP address for a specific period of time. You can do so via the Temporary Allow/Deny option. You need to select if you want to allow or block an IP address; enter the IP and the time you want the rule to be active. By default all ports are blocked, but you can specify one or more ports to limit the rule to certain services. The comment field is optional and for your records only.

Image: You can allow or block an IP address temporarily.
Temporary allow and block rules are not saved in csf.allow or csf.deny. However, you can view view temporary rules via Temporary IP Entries. The page gives you the option to unblock or permanently block an IP or the remove all temporary blocks.
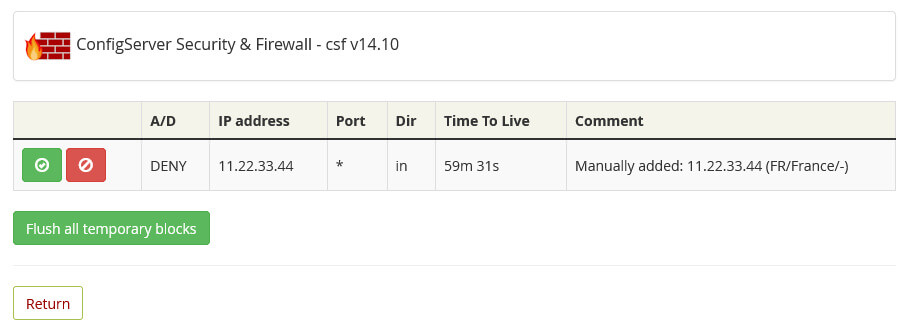
Image: A list with naughty IPs.
And finally, there is also a Flush all Blocks option. As the name suggests, this removes both temporary and permanent blocks. The only exception are IPs that have a comment that ends with “do not delete”.
CSF on the command line
All the options I looked at in this article can be performed on the command line. If you prefer your terminal over a “pointy-clicky” interface then you can read about the command line usage in the article about CSF on the command line.