Both cPanel and WordPress have a great graphical interface. If you enjoy the command line, though, you might prefer to instead do various jobs via SSH. In this article we walk you through installing WordPress from the command line.
Before we dive in, WordPress has thorough documentation on installing WordPress. This article has been written specifically for cPanel servers, and we recommend you first read the official documentation. Also, feel free to submit a ticket if you are not comfortable installing WordPress. We are happy to do it for you.
Download and extract the website files
We will install a copy of WordPress for the domain example.com. The website is hosted on one of our Premium servers. Our user name is example and the server’s hostname is cpweb6-premium.active-ns.com.
To start we need to download the WordPress tar.gz or zip archive. This is a compressed archive containing all the core WordPress files. For this article we will download the archive to the public_html directory, so we first change to that folder:
[example@cpweb6-premium ~]$ cd ~/public_html
We can now use wget to grab the latest WordPress version:
[example@cpweb6-premium public_html]$ wget https://wordpress.org/latest.tar.gz
It is always a good idea to have a quick look at the files in an archive before extracting them. The reason is that blindly extracting an archive can overwrite existing files. For instance, if you already got website files in the public_html directory then those files are replaced if they also exist in the archive.
As an aside, archive files should always store its content in a separate directory. Archives that simply extract lots of files all over the current directory are commonly known as tarbombs.
[example@cpweb6-premium public_html]$ tar -tf latest.tar.gz | head -5
wordpress/
wordpress/xmlrpc.php
wordpress/wp-blog-header.php
wordpress/readme.html
wordpress/wp-signup.php
The output of the above tar -tf command shows that all the WordPress files live in a directory named wordpress. In other words, we are not dealing with a tarbomb, and it is safe to extract the archive:
[example@cpweb6-premium public_html]$ tar -xzf latest.tar.gz

[example@cpweb6-premium public_html]$ ls -1F --group-directories-first
cgi-bin/
wordpress/
Our public_html directory now contains a directory named wordpress. As there are no website files in the public_html directory we can next move the files from the wordpress to the public_html directory. The best tool for that job is rsync:
[example@cpweb6-premium public_html]$ rsync -a wordpress/ ./

[example@cpweb6-premium public_html]$ ls -1F --group-directories-first
cgi-bin/
wordpress/
wp-admin/
wp-content/
wp-includes/
index.php
latest.tar.gz
license.txt
readme.html
wp-activate.php
wp-blog-header.php
wp-comments-post.php
wp-config-sample.php
wp-cron.php
...
Create the database
On cPanel servers you can’t create databases and database users from the command line. Instead, you need to use the Databases interface in cPanel. Don’t forget to make a note of the database name, user and password, as they need to be added to the wp-config.php file.
Create the wp-config.php file
You can now create the wp-config.php file by copying the wp-config-sample.php file:
[example@cpweb6-premium public_html]$ cp wp-config-sample.php wp-config.php
And next you need to enter the database credentials and, optionally, the table prefix. By default all tables are prefixed with the string wp_. In theory, changing that default makes your WordPress install more secure, as attackers who are able to execute SQL commands can’t simply use the default table names. However, an attacker who can run SQL commands against your database won’t have much trouble retrieving the table prefix from the database. Still, we will change the default prefix, just because we can.
You can edit the wp-config.php file via cPanel’s file manager or a command line editor such as nano or vi. You can also use sed:
[example@cpweb6-premium public_html]$ sed -i 's/database_name_here/example_wpdb20/' wp-config.php
[example@cpweb6-premium public_html]$ sed -i 's/username_here/example_usr/' wp-config.php
[example@cpweb6-premium public_html]$ sed -i 's/password_here/zAG6bj5P-KP_Sr6Vt2otLSn7qW/' wp-config.php
[example@cpweb6-premium public_html]$ sed -i "s/$table_prefix = 'wp_'/$table_prefix = 'c2_'/" wp-config.php
The third command shows the database password. Whenever you run a command that includes a password you want to make sure to remove the command from your command line history:
[example@cpweb6-premium public_html]$ history | grep password_here
   33 sed -i 's/password_here/zAG6bj5P-KP_Sr6Vt2otLSn7qW/' wp-config.php
[example@cpweb6-premium public_html]$ history -d 33
Here, the sed command we used to change the password had the number 33. The command history -d 33 deletes the entry, so that it is no longer stored in the ~/.bash_history file.
Run the install script
To finish the installation you can point your browser at the install script. For our example.com website the URL would be example.com/wp-admin/install.php.
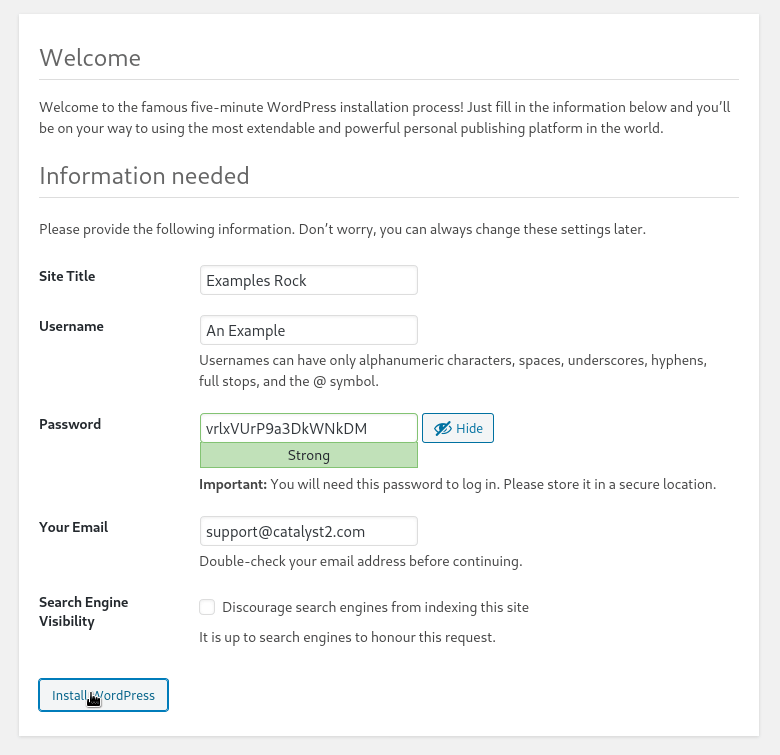
Image: the WordPress install script.
As we have already entered the database credentials in the wp-config.php file the install script needs very little information. You only have to enter the website’s name; create a user for the WordPress dashboard and hit the Install WordPress button.
Tidy up
After you have verified that everything is working you can remove the WordPress archive file we downloaded. You also no longer need the wordpress directory to which the WordPress tarball was extracted:
[example@cpweb6-premium ~]$ rm -f ~/public_html/latest.tar.gz
[example@cpweb6-premium ~]$ rm -rf ~/public_html/wordpress